Shifts are used throughout the product to identify the periods to be used when capturing, comparing and reporting of data, such as when capturing the material movements.
Unit of Measure are used throughout the MiiNT system to measure different units, such as equipment truck factors for the measurement of material movements.
Any Site specific project details can be store within MiiNT using the Site option.
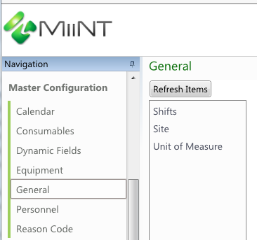
This is were the Shift, Unit of Measure and Site project details are created and managed within the MiiNT system.
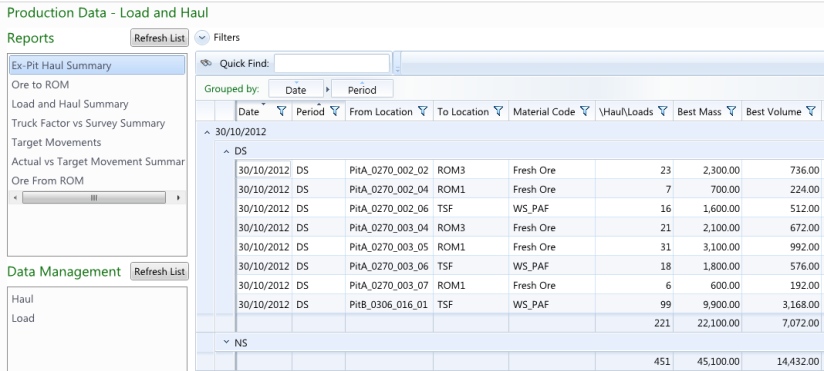
The example below is an Ex-Pit Haul Summary report is grouped by Periods within Date.
To view and manage the Shift, UOM and Site lists within MiiNT click on the Master Configuration > General option to display master data associated with Shifts, UOM and Site that can be maintained.
The table below lists all the tables associated with Shift, UOM and Site data that can be managed.
| Data Management Tables | Description |
|---|---|
|
Unit of Measure |
List of the available unit of measures for use within MiiNT. |
|
Shift |
List of the available shifts for use within MiiNT. |
|
Site |
List of any site specific data for use within MiiNT, such as site projects. |
The table below lists fields displayed for the Unit of Measure table.
| Fields | Value |
|---|---|
|
UOM Code |
Enter the code of the unit of measure, this should be the code used to identify the UOM. |
|
Description |
Enter the description of the unit of measure. The description may be used for reporting in place of the code if required. |
|
Symbol |
Enter the symbol of the unit of measure to be used. |
|
Active |
Click the Active checkbox to activate the unit of measure. Note: Only active unit of measures will appear in the lookups and reports. |
Note: The above fields should be used as a guide only as tooltips can be used to customise the field names for your configuration.
The table below lists fields displayed for the Shifts table.
| Fields | Value |
|---|---|
|
Shift Code |
Enter the code of the shift, this should be the code used to identify the shift period. |
|
Description |
Enter the description of the shift period. The description may be used for reporting in place of the code if required. |
|
Start Time |
Enter the Start time of the shift period code. Note: Time is based on a 24 hour clock. This field only applies to periods which are 24 hours or less |
|
End Time |
Enter the End time of the shift period code. Note: Time is based on a 24 hour clock. This field only applies to periods which are 24 hours or less |
|
Sequence Order |
Enter the number that represents the sequence the shift period code occurs within a 24 hour period. Note: This only applies when multiple periods make up 24 hours. |
|
Active |
Click the Active checkbox to activate the shift. Note: Only active shifts will appear in the lookups and reports. |
Note: The above fields should be used as a guide only as tooltips can be used to customise the field names for your configuration.
The table below lists fields displayed for the Site table.
| Fields | Value |
|---|---|
|
Site Code |
Enter the code of the site project, this should be the code used to identify the site project. |
|
Description |
Enter the description of the site project. The description may be used for reporting in place of the code if required. |
|
Active |
Click the Active checkbox to activate the site project. Note: Only active site projects will appear in the lookups and reports. |
Note: The above fields should be used as a guide only as tooltips can be used to customise the field names for your configuration.
Refer to the Data Management Pages topic for information on how to Add, Adjust and Delete records.